

Using Filters in Colleagues
Add Filters
Filters are located above the colleague’s data table.
- To add filters to the data table click on one of the filters. A dropdown will appear, choose from the an option from the drop down list to add a filter.
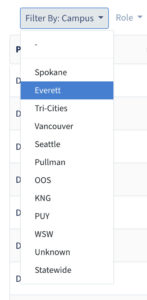
You can only choose one option from each filter list, for example if you want to filter by campus you can only filter by Spokane. If you are wanting to export a list of faculty at Spokane and Everett you will have to export Spokane then change the campus filter to Everett and export that group seperately.
- You can add additional filters if needed. For example you can filter by Campus and Specialty.
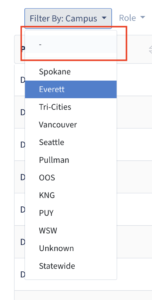
Remove Single Filter
- Click on the filter you would like to remove and a dropdown list will appear.
- Click on the hyphen at the top of the list and the filter will be removed.
Remove All Filters
- To remove all filters, click the red Remove Filters link, located on right-hand side of the filters.

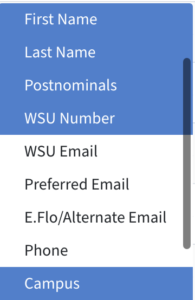
Column Visibility
Column visibility allows you to control which columns are displayed in the colleague’s table. It allows you to narrow the data down to the data points you need to look at, such as Campus, Specialty and Paid Status.
Show Column
- To control which columns are show in the data table you will need to scroll to the bottom of the data table.
- At the bottom of the data table you will find the Column visibility dropdown. Click the Column Visibility dropdown to select which columns you would like to show.
- Once you click on a column you would like to show the column name will highlight in blue.
Hide Column
- To remove a column previously selected, click the Column Visibility dropdown.
- Scroll though the Column Visibility dropdown and click on the column name you would like to remove.
- The column will be removed.
Exporting Data
Before attempting to export data from the Colleague's data table you will need to filter the data down. If you try to export too large of a data set the export may fail.
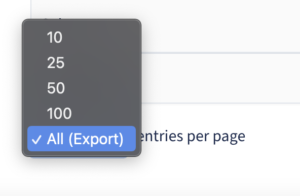
- Scroll down to the bottom of the data table to the entries per page dropdown, which is located on the left-hand side below the data table.
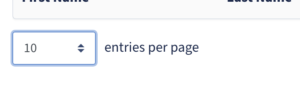
- Click on the dropdown and choose All(Export) from the dropdown list. Once you select this option it may take time to show all.
- Scroll back down to the bottom of the page if you are not already there and click on the Export dropdown located at the bottom of the data table in the middle of the page.
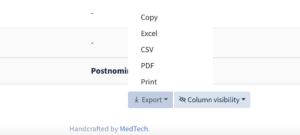
- You can choose from the following options:
- Copy – this option will copy the data in the table.
- Excel – this option will download the data as an Excel file to your computer.
- CSV – this option will download the data as a CSV file to your computer.
- PDF – this option will download the data as a PDF file to your computer.
- Print – this option will open the print prompt on your computer with the data ready to print.