


You need permission in Colleagues to create a new faculty appointment. To request access, please submit a request to the MedTech Development Team.
New Community Faculty appointments is a workflow that takes place in both the Colleagues App and Asana. In this tutorial you will learn how to create a new colleague as well as how to walk them through the appointment process.
Recruitment Phase

To get started check to see if a profile exists by searching by the faculty’s name on the All Colleagues view.
- If the profile exists navigate to the Employment tab in the colleague’s record and verify the Primary Employment Type is set to Recruitment Phase, if this field is empty or has another value change the value to Recruitment Phase.
- If the profile does not exist you will need to create a new colleague. Fill in the required fields, for the Primary Employment Type, select Recruitment Phase from the dropdown.
Candidacy Appointment Phase
Once your ADCE confirms a candidate is ready to move from recruitment phase to candidacy phase you can add a new appointment in the appointment tab in the colleagues record.

- To start the appointment process for a colleague, click the add new appointment button on the colleague record.
- In the appointment form, fill out all fields marked in green. Please make sure to check non-paid in the Paid Status field.
- Upload the following documents to the candidate documents field in the appointment tab, to upload click the browse button:
- CV
- Rank Recommendation From
- Any additional data provided by the ADCE or candidate. (Sometimes candidates will send a letter or interest).
- Save the colleague’s record.
- Non-paid paid status and Priority Candidacy Appointment Phase will automatically add the colleague to the Community Faculty Appointment Project in Asana in the New Candidate column (You will have to save the colleague record before the colleague will appear in Asana).
- To view colleague in Asana, click the yellow Open in Asana button. A new tab will open the colleague’s task in the Community Faculty Appointment Project in Asana
Background Checks
Background checks are handled in the Community Faculty Appointment Project in Asana in the Background Checks column. Once a candidate’s intake is complete (documents saved to Colleagues, Colleagues profile complete), changing the intake task from Started to Done will move a candidate to the Background Check task.
Appointment Letters

Appointment signature forms will expire two weeks after creation.
- Once the background check task is marked “Done”, the candidate moves to the Appointment Letter task. In order to generate an appointment signature form, you will need to have all fields with green labels filled out in the Appointment tab in Colleagues and save the colleagues record.
- A link to the appointment signature form will populate in the Appointment Signature Link field.
- To preview the form, click the Preview Appointment Signature Form link.
- To the right of the preview link is the expiry date of the form.
- Campus admins will forward Appointment Signature Form links to candidates.
- The digital signature link to the signed appointment letter is automatically captured in Colleages and the candidate is moved to the WSU Systems task in Asana.
WSU Systems
MyWSU Campus Community Profile
Before you create a Campus Community Profile, have the colleague's profile open in the Colleagues app to use the data in their profile to create their Campus Community Profile.
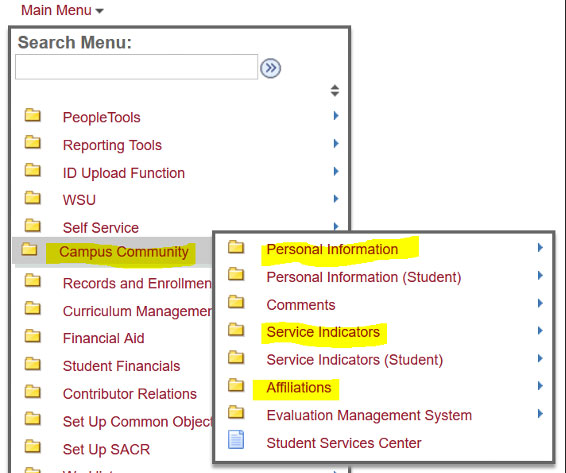
- Go to MyWSU and navigate to the main menu.
- Click the Campus Community link and a submenu will appear, click Personal Information.
- Before creating a new profile search to make sure a profile doesn’t already exist in the WSU system for the colleague you are working on. To search for an existing profile, select update a person in the Personal Information section in Campus Community.
- If there is a similar name that comes up in your search cross check the profile with identifiers such as:
- date of birth
- middle name
- phone number
- address
- If there is a similar name that comes up in your search cross check the profile with identifiers such as:
- If you find a profile that already exists skip to step 9. Please note that if a profile is was created prior to 2016 you will need to contact the Crimson Desk to have the WSU email reactivated.
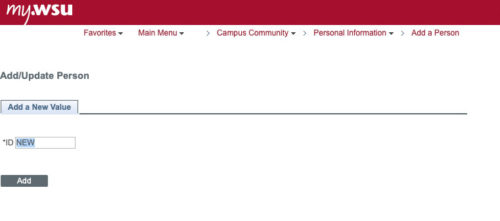
- If you do not find an existing profile, add a new profile by by clicking add a person.

- Add the following profile information:
- Legal name (first, middle or middle initial if available, last)
- Make sure you have the correct spelling. We do not have the ability to change their name after the profile is created.
- If you are able to catch a spelling error shortly after the profile is created it is possible payroll can change the name. You will have to send them an email.
- If you catch the error later, a name change will be required.
- Make sure you have the correct spelling. We do not have the ability to change their name after the profile is created.
- Date of birth (if available)
- Phone number (if you know multiple phone numbers, please enter those as well, indicating which are preferred)
- Email ( if you know multiple email addresses please enter those as well, indicating which are preferred)
- Address
- Any other information from CV
- Legal name (first, middle or middle initial if available, last)
- Click save and a window will pop up for you to review the profile information and ensure you are not creating a duplicate profile.
- Confirm you want to continue creating the new profile.
- Once you have created a new profile a WSU ID will be created for the profile, copy the WSU ID and add it to Employment Tab WSU Number field in Colleagues.
Affiliation
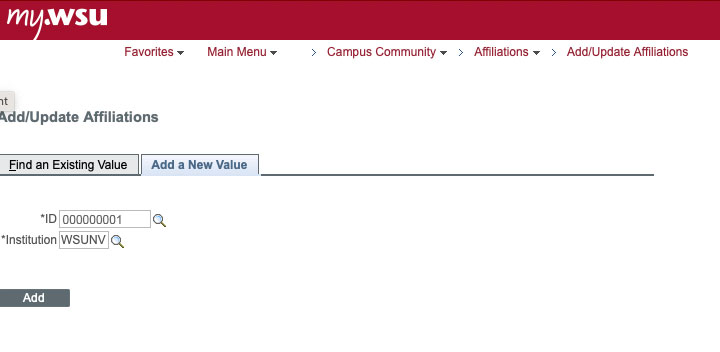
- Navigate to the main menu and click Campus Community.
- A submenu will appear, click Affiliations.
- Click Add Affiliation.
- Paste WSU ID.
- After pasting WSU ID, select Add a New Value.
- Use Clinic_S for the affiliation code.
- Add the start and end date.
- Select Active as the descriptor.
- Click Save.
Adding an affiliation will create a network ID and WSU email. An email will be sent to the colleague with their network ID and instructions on how to set up a password and Okta account. It can take anywhere from a couple hours up to 24 hours to see the email in the colleague’s community profile.
Service Indicator
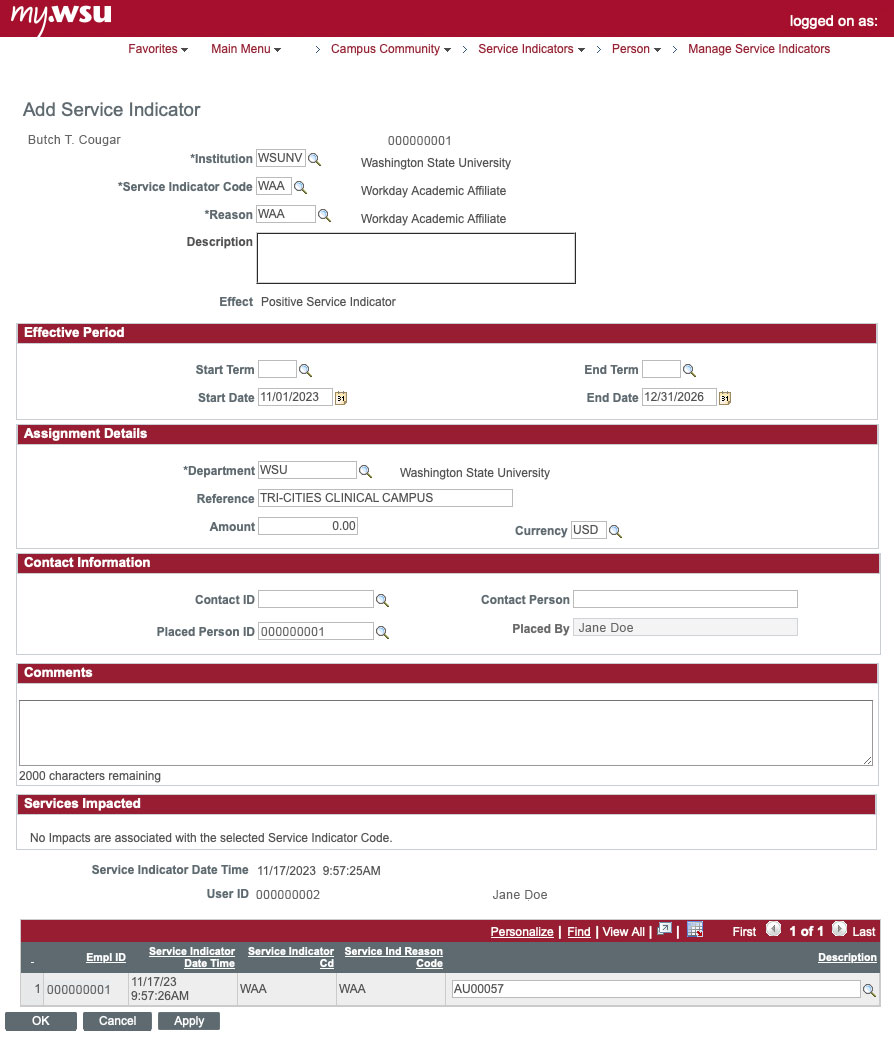
- Navigate to main menu and click Campus Community.
- A submenu will appear, click Service Indicators.
- Enter Service Indicator Code WAA
- Enter Reason as WAA
- In the Effective Period add the Start Date and End Date.
- In Assignment Details enter Reference as CLINICAL CAMPUS. Enter campus location, then Clinical Campus, i.e. Spokane Clinical Campus.
- Add AU00057 to the Description field towards the bottom of the form.
- Click Apply and then OK.
Completing this step will populate the colleagues data in Workday. This could take a while. If it has been longer than 24 hours and the person isn’t showing up in Workday, there may be an error which will require submitting a Workday work ticket.
Workday
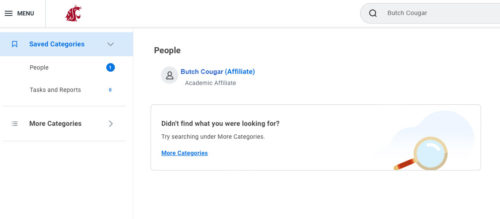
The next step is to update the Workday appointment. You can search Workday by entering a person’s name or WSU ID number. You may need to select “more categories” to find the person. The profile will show up with the colleagues’s name, and (Affiliate) next to their name in parenthesis. Click on the name to open the profile. Below is an example of what you will see in on their profile.

- Go to the Academic tab.
- Do not add a new Appointment, just update the information that was populated from MyWSU.
- Click Update.
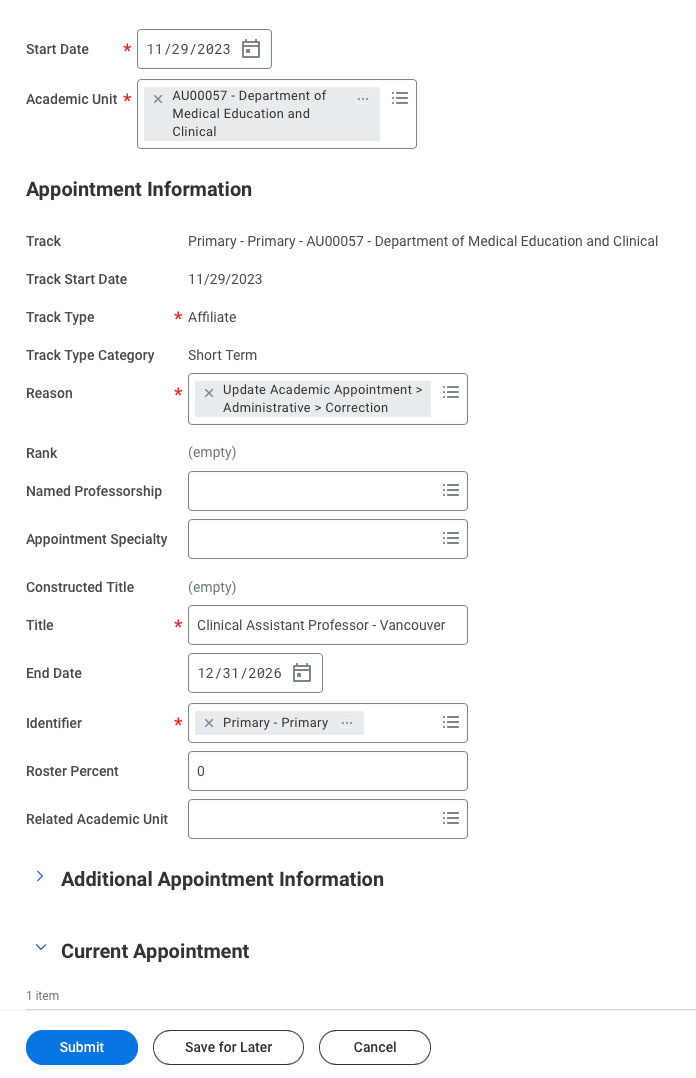
- This will take you to a screen showing the Academic Appointee (name), Track (Primary-Primary, AU00057 – Department of Medical Education and Clinical. You will need to enter the start date from the Appointment letter and click OK. An alert will pop up saying “This Academic Appointee already has an appointment with the same start date. If you select the same Appointment Start Date, your change replaces the existing appointment” (Which is what you want to do.)
- Click OK again to bring up the appointment. The only fields you need to adjust are the Reason, which is Update Academic Appointment Administrative Correction, the Title, which you will find on the Appointment letter – locations. For example: Clinical Assistant Professor – Vancouver. And the end date, which is also found on the appointment letter.
- Click Submit.
Colleagues

- Go back to Colleagues to update the colleague’s profile.
- In the Employment tab update the following fields:
- Primary Employment Type needs to be updated to “Appointed Faculty”.
- WSU Number
- WSU Email
- Click Save and edit this item.
Asana
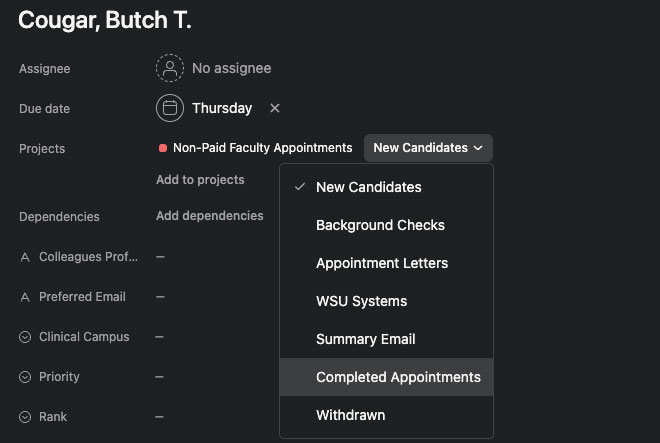
Once all of the above steps have been completed, open the Community Faculty Appointments project in Asana.
- Click the yellow Open in Asana button on the Appointment tab on the colleague’s profile. This will automatically open their task in Asana.
- Changing it to Done will automatically move the Asana profile to the Summary Email task for the Campus Admins to complete.
Summary Email
A Congratulations Email template will become available after the previous steps have been completed and similar to the Appointment Letter, a template that is auto-populated with data from the completed fields in Colleagues will become available. Campus admins will forward this email containing the information needed for onboarding.