FindTime

Our Technology Outlook FindTime

Table of Contents

5-min read

When scheduling a meeting with a large group of people, it can be difficult to find a time that works for everyone! Sure, the Outlook Scheduling Assistant is very handy for checking availability, but sometimes you want to be flexible with when that meeting occurs or would like to allow your participants to play a role in finding a time. Enter . . . FindTime

How to Create a Meeting Poll

FindTime is a default feature in our Outlook, so you don’t need to install anything! When you’re ready to start finding time, follow these instructions:

  1. Start an email to those who will attend your meeting. If you have an existing email thread, you can do this in a Reply to All.
  2. Click the FindTime button at the top of the email draft window or click into More Options to find this.
  1. A new window will open in a right sidebar.
  2. First, you’ll select times for your meeting poll. You can use the Arrow buttons to navigate to future weeks or months. Also check your meeting duration—it defaults to an hour but can be 15 minutes to 8 hours, and everything in between.
  3. Click on a single day to preview your meeting attendees availability. Days with more availability will be green, while days with less availability will be red. FindTime tries to make it easy by listing times when all participants are available, but you can also scroll to see individual participants availability under other time slots.
    • Green icons indicate open availability
    • Red icons indicate no availability
    • Purple icons indicate a tentative availability
  1. To dive in even deeper, click the Person/Clock icon on the right side of a time slot to see a list of attendees’ availability or click the Calendar icon to see a small view of your calendar and potential conflicts.
  1. Click on the Times you would like to add to the meeting poll. You can select times on different days and in different weeks. When ready, click Next at the bottom of the window.
  2. Now you’ll see a list of options. Choose how you’d like to manage the poll settings.

Poll Settings

You’ll receive an email every time a participant votes.

Creates and sends a meeting invite as soon as everyone votes. This is not a good option for Zoom meetings and large meeting invites where not everyone may vote.  

This option places a tentative hold in your calendar for all the selected times. These holds are removed once the meeting is finalized, or the poll is cancelled.

The language that you use in FindTime will be used to send related email notifications.

Attendees will not be able to suggest new times or edit other attendees.

To help prevent anonymous voting, attendees will be required to authenticate before voting.

  1. When ready, click Add to Email at the bottom of the window. The poll will be added to your email body automatically!

Review Meeting Polls

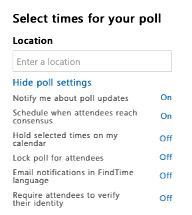
Depending on your chosen settings, you could track responses to your poll and have the meeting auto schedule upon consensus. Occasionally, it is helpful to review your poll’s progress. 

Go to FindTime and sign in with your WSU credentials. Here, you’ll see a dashboard with your polls that are in progress, completed, and expired.

findtime-poll-review-image

Click on a Poll to see how attendees are voting or add new attendees.

Voilà! You’ve found an easier way to schedule.

Keep Learning

Add Your E.Flo Calendar to Outlook