Get Started with College-wide Communications
Slack is a messenger application that allows for instant communication. It works similar to other applications you may be familiar with, such as Facebook Messenger or Instagram. One benefit of using Slack is the ability to have secured channels to contact anyone within the College of Medicine.
Create an Account
Click the button to create an account.
Activate Your Account
If you already have an account, click the button to go directly to our Slack workspace.
A link will go to your email to authenticate your account. Follow the prompts to finish account creation. Then you should be able to log in and finish setting up your profile.
All Slack communications are performed through the Elson S. Floyd College of Medicine workspace. Find it here: WSU-medicine.slack.com
Download and Install Slack
You can download the Slack app to your desktop or mobile device instead of using Slack through your browser. If you are setting up Slack on a College of Medicine iPad, the Slack application has already been installed, and you can skip to the login instructions!
Log In
- Open the Slack application.
- Enter our Slack URL wsu-medicine, then click Continue. If you’re already signed in to another Slack workspace, click the + plus button in the far-left sidebar. Then select Sign in to Another Workspace.
- Enter your sign-in email address, then click Continue.
- Enter your password and check the box next to Keep me signed in.
- Click Sign In.
- Open the Slack app on your iPad .
- Tap Sign In, and then tap I’ll Sign In Manually.
- Type in wsu-medicine for the Slack workplace URL and tap Next.
- Enter your WSU email and Slack password to complete the sign-in process.
Set Up Your Profile
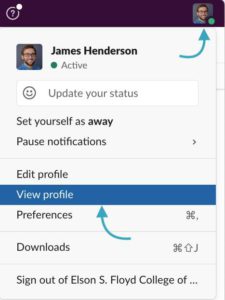
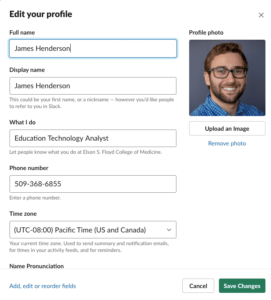
Click your Profile picture in the upper-right-hand corner and select Profile to view and edit. A side panel will open to display your current profile. Click Edit Profile to make changes and add information, including:
- A profile picture.
- Your title.
- Fun facts.
- How you’d prefer to be contacted.
- And more!
Channels
Channels are public or private spaces meant for a specific group of people or a certain topic.
Private Channels
Only members of a private channel can see that the channel exists. New members of a private channel must be invited by a current member.
(If you already know the name of a channel, type the channel’s name in the top search bar to find it quickly.)
- If you’d like to browse existing channels, tap the + plus button next to Channels.
- Scroll through the list of existing channels and select the one you would like to join.
- A preview of the channel shows. To join that channel, tap Join Channel at the bottom right.
- Click the + plus button next to Channels, then select Create a Channel.
- Type in the name of your channel and provide a description, if you have one.
- Decide whether this will be a public or private channel and set the toggle accordingly.
- Click Create.
- The next prompt allows you to invite others. If you’re not ready for this step, skip it and invite people later.
- Navigate to the channel where you’d like to invite someone.
- Click the member images in the top-right corner.
- Select Add People.
- Type the names of the people you would like to add and then select Invite.
- Select the channel you would like to chat in.
- Type your message in the text area at the bottom.
- Chat and share your information!
Direct Messages
If you’ve DM’d someone before or if someone has DM’d you, their name may appear in your sidebar under Direct Messages. To start a new DM:


