Jamboard

Our Technology Jamboard

Table of Contents

5-min read

Jamboard is a handy tool for digital whiteboarding that can be used in a pre-planned way or “on the fly” with your students, giving you flexibility in content delivery.

A note before you begin: You will need a Google account to access Jamboard and build a “Jam” to share with your students. Anyone can access the Jamboard during its delivery as long as the permissions are set up correctly. If you’d like to use your WSU account for this, please contact us, and we can get you set up!

Create a New Jamboard

  1. To get started, go to jamboard.google.com and sign in to your account.


  1. Once you get to your main page, you can view Jams that you have created or those that have been shared with you, or create a new one using the Plus + icon.

Navigate Jamboard

Moving around in Jamboard is easy, and even better—your participants have the same tools and can join in the fun!

Once you create a New Jam, take a look around.

Zoom

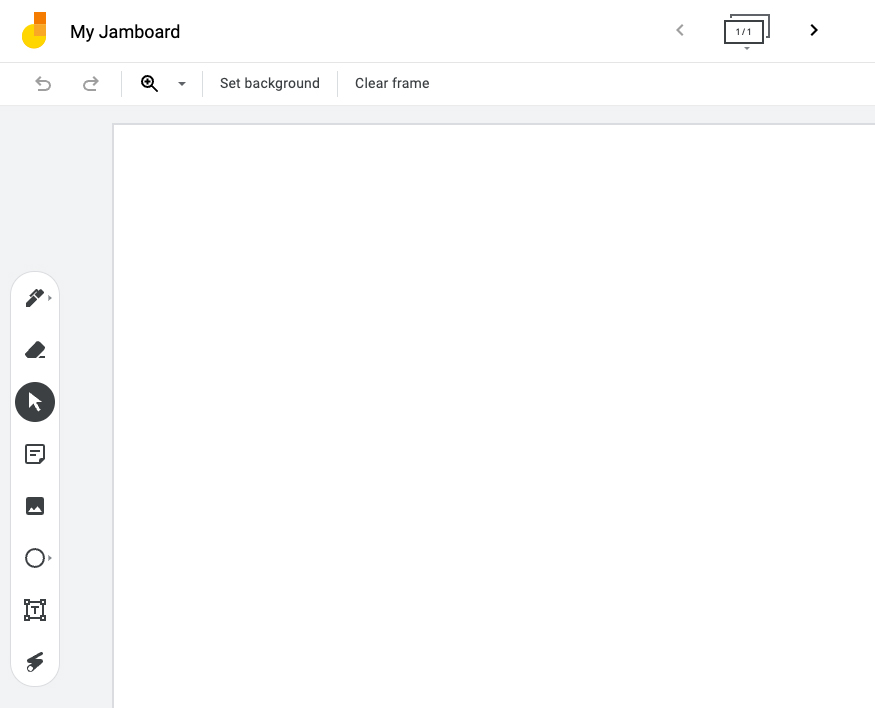
Zoom Tool: Click or Tap to Zoom in or out on the page.

Set Background

Set Background: Change the Jamboard background with pre-set backgrounds, or upload an image from your computer, URL, Camera, Google Image Search, Google Drive, or Google Photos.

Clear Frame

Clear Frame: Click or Tap Clear frame to remove everything from the Jamboard.

Slide Scroll Bar

Sliding Scroll Bar: Click or Tap on the Slide icon to move through all the slides. Add, delete, or move the slides to create your preferred presentation. Use the Arrow buttons to advance or backup to the slide you would like to work on.

Pen Tool

Pen Tool: Click or Tap the Pen icon to open the pen options and colors.

Eraser Tool

Eraser Tool: Click or Tap on the Eraser icon to erase your work.

Mouse Pointer

Mouse pointer: Click or Tap on the Mouse pointer to return to standard navigation once you are done using the other tools.

Sticky Notes

Sticky Notes: Use the Sticky Note icon to add comments and engage in the Jamboard presentation.

Insert Image

Insert Image: Click or Tap on the Image icon to add an image to the page. Upload an image from your computer, URL, Camera, Google Image Search, Google Drive, or Google Photos.

Insert Shapes

Insert Shapes: Click or Tap on the Shape icon to choose from a palette of shapes. Draw the desired shape on the Jamboard.

Insert Text Box

Insert Text Box: Click or Tap on the Text box icon to add text to the Jamboard.

Pointer Tool

Laser Pointer Tool: If you are presenting on the Jamboard, use the Laser pointer icon to highlight or point to information.

Jamboard Tools

Share a Jamboard

  1. When you’re ready to jam with your participants, click the Share button on the top right side of the page.
  • Before you click Copy link and the Done button, look at the options available for General access
  • In most cases, you will change the General access to Anyone with a link. Then, open the permissions to Editor, if you want participants to:
    • Add sticky notes or text fields.
    • Use their pen to circle or highlight anything on the Jamboard.
  1. Once you Copy the link, and make sure the permissions are set properly according to your preference, add the Link to a chat in Zoom and begin whiteboarding

Export a Jamboard

The Ellipsis next to the Share button allows you to save your Jamboard for posterity or delete it. Save the entire Jamboard as a PDF or one frame as an image. This is handy if you’d like to keep a copy to share with your participants after the presentation—or Jam—is over.  

Related Reading

Best Practices for Remote Learning